Manage Members
The Manage Members section can be found in the portal at the following URL:
https://members.onlytease.com/portal:members
This page gives you 3 options:
- Find Member – Use this to find an existing member by either a full or partial email address or their User UUID
- Add New Member – Use this to add a new member to the site.
- Merge Accounts – Use this option to merge a user’s old account into their current account. As per the warning messages on the page, use this option with extreme caution as it CAN NOT be undone.
Add New Member
The “Add New Member” option allows you to create a new user account in the database. You will need to enter their email address and a good password into the form as a minimum and if you are adding an “admin” or “model” user type, add a “Forum Nickname” as well.
Once you have added the member, you will be taken to the user’s “Manage” page. By default, a member added like this is not activated, so the first thing you need to do is activate the account by clicking on the “Activate Account” link under the “Members Details” section on the left:

Also, new members will have no “subscriptions” associated with their account so are “free” members. If you would like this user to have a subscription you can manually add one using the “Add Manual Subscription” option in the right-hand column.
Merge Accounts
The merge accounts option allows you to “move” all the data associated with one account onto the other and close off the account the data is being moved from. This is useful if the user has created a new account on a new email address but would like the history from their old account(s) on their new account.
It can be used multiple times with the same “new” account, so if the user has several old accounts you can use it several times to move those old accounts to their new account.
Manage Member
Once you have found the member you are looking for, you will get the “Manage Member” page. This page is split into two columns, on the left you have all the details about the member and on the right, you have controls that allow you to make changes to the member.
The page will look something like this example:
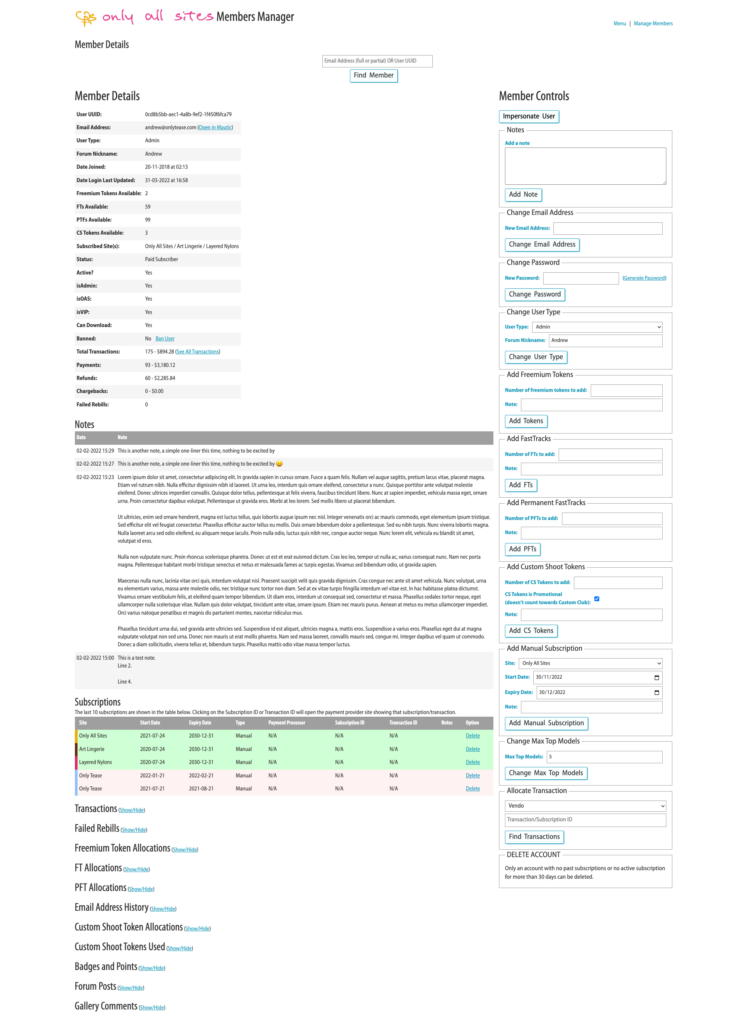
Member Details
The “Members Details” section outlines all the main information about the member including their status, subscribed sites, FTs, PFTs, Custom Shoot Tokens, etc… as well as an overview of their transactions.
Activate Account
By default, new “free” accounts added by either a user or via the “Manage Members” home page are not activated. These will normally be activated by the user using a link that is emailed to them. However, if you need to activate an account, you can do that by clicking the “Activate Account” link under the “Member Details” section:

Once clicked, the account will have been activated and there is no option to deactivate the account.
VIP Access
VIP Access normally requires 3 months of paid membership, however, you can give a member VIP access before this time by clicking the “Give VIP Access” link under the “Member Details” section:

Once clicked, the account will have VIP Access and there is no option to remove the VIP Access from the account.
Download Access
New accounts with a subscription are not able to download ZIP files and Videos until 3 days after their account was created. If you need to give a member download access sooner than this, you can do this by clicking the “Give Download Access” link under the “Member Details” section:

Once clicked, the account will have the ability to download ZIPs and Videos and there is no option to remove the Download Access from the account.
Ban User
If for some reason, you need to stop a member from being able to log in to the site, you will need to use the “Ban User” option to ban their account. Click the “Ban User” link:

This will set their account to banned and they will no longer be able to log in. When a users account is banned this message will appear at the top of the “Members Details” section:

You can remove the ban on a banned user by clicking the “Remove Ban” link:

Financial Overview
At the bottom the “Members Details” section, you will find a summary of the members spending with the sites. This includes:
- Total Transactions – The number of transactions the user has made and the total these amount to (e.g. Payments minus Refunds)
- Payments – The total number of payments made and the total these amount to.
- Refunds – The total number of refunds made to this user and the total these amount to.
- Chargebacks – The total number of chargebacks this user has made and the total these amount to.
- Failed Rebills – The total number of failed rebills this user has had and details of any failed rebilled in the past 30 days.
Other Information
Below the “Members Details” section other information is given. By default, all but the “Subscriptions” section is hidden but can be shown (or hidden again) using the “Show/Hide” link next to the title:

These sections cover the following information:
- Transactions – All transactions the user has done with the site(s) for the entire time their account has existed.
- Failed Rebills – All failed rebills the user has had for the entire time their account has existed.
- Freemium Token Allocations – Any time freemium tokens have been allocated to the user’s account, with the date, number allocated, if they were added manually and any note added.
- FT / PFT Allocations – Any time FTs/PFTs have been allocated to the user’s account, along with how many were added and any note added.
- Email Address History – A list of all previous email addresses associated with this account. These can come from either the user changing their email address on the site, from an admin changing it for them in this tool or from the “merge” accounts process.
- Custom Shoot Token Allocations – Any time a Custom Shoot Token has been allocated to the user’s account, if the token has been used and any note added.
- Custom Shoot Tokens Used – A list of the custom shoots that the user has ordered, the date they placed the order, which model it was with and if the custom has been linked to a shoot. The model name and custom UUID in the central column will be linked to the custom shoot details in the portal. Clicking this will open the custom shoot details in a new tab. If linked to a shoot, the linked column will contain “Yes” and then the site initials the set appears on. This will be linked to the set, so clicking it will open that set on the appropriate site in a new tab.
- Badges and Points – This is split into 4 sections, total points earnt and spent, points the member has spent and on what, badges earned and level and the events tracked for the member.
- Forum Posts – This shows an overview of the number of threads started and replies the member has made along with a list of their last 10 forum posts made (date/time) along with the subject of the thread that links to the thread in a new tab.
- Gallery Comments – This shows how many gallery comments the member has made in total as well as their last 10 comments, the date/time made, the site/gallery the comment was made on (linked to the gallery), the comment made and whether or not the comment is shown.
Member Controls
On the right-hand side of the page, you will find the “Member Controls”. These options allow you to manage the user.
Impersonate User
This option allows you to log in to the site you are using the portal on as this particular user. To do this, simply click on the “Impersonate User” button and it will open the site and you will logged in as that user. Whilst on the site as that user, this banner will appear at the top of the page:

Once you have finished whatever you need to do as this user, click the “CLICK HERE” link in the above banner message to return to your session in the portal, it will take you back to the same manage member page you originally came from.
This option is site-specific, so if you need to impersonate the user on say the Art-Lingerie site, you will need to login to the portal on the AL site, find the member there and then use the “Impersonate User” button in that portal.
Notes
This option allows you to add a note about the user. Once the note has been added it will appear in the “notes” section on the left and will also show the date and time added along with the user how added the note. Once added, notes cannot be edited.
Change Email Address
This option allows you to change the primary email addresses of the user. Once changed the previous email address will be logged in the “Email Address History” section on the left.
Change Password
This option allows you to change the password for the account. There is an option to generate a random password and it is probably best to use this option the majority of the time.
Unlike the front end of the website, there is no check on the password “strength” in the portal and you can set it to anything you like.
Change User Type
This option allows you to change the user type of the account as well as set the user’s forum nickname. Be careful with this option not to change a standard user into an admin user, unless they really need to be an admin user.
Add Freemium Tokens / FastTracks / Permanent FastTracks / Custom Shoot Tokens
These 4 options all allow you to add the associated type of “token” to the user’s account along with a note. Once added these additional “tokens” will appear in the user’s balance on the left as in the appropriate “allocation” section along with the note added.
Custom Shoot Tokens also has an additional option, checked by default, to say the CS token is promotional and doesn’t count towards the custom shoot club. The only time this should be unticked, when adding CS tokens, is if the token was purchased but not allocated to the user’s account for some reason.
Add Manual Subscription
This option allows you to add a subscription to the user’s account manually. You can select the site along with the start and end dates of the subscription and a note as to why you are adding the manual subscription. Once added this subscription will appear in the “subscriptions” list on the left.
Manually added subscriptions can also be deleted using the option next to them in the list on the left.
Change Max Top Models
This option allows you to change the maximum number of top models a user can select and view as a past member. The default value is 5.
A “past” member is able to view all the sets for their “top models” released up until the day their last subscription expired. By changing this number, you can give specific past members access to more than 5 top models, if desired.
Allocate Transaction
This option allows you to allocate a transaction to a user’s account. Sometimes the transactions cannot be allocated automatically because the system cannot determine from the information received from the payment gateway which user’s account it should be allocated to. In this instance, you can find the transaction using this option and then allocate it to the account. If the transaction is already allocated to a different account, the system will tell you this and link you to the account it is already allocated to.
It might be the user has 2 different accounts, with different email addresses and these 2 accounts need to be merged instead.
Delete Account
This option allows you to delete an account. Deleting the account is only available for accounts that have not had an active subscription in the past 30 days and this option actually deletes the account from the database, so should be rarely used and only once the user has confirmed they 100% want their account completely deleted.